
Introduction to Memory Forensics
Memory Forensics is the analysis of memory files acquired from digital devices. The primary purpose of Memory Forensics is to acquire useful information from the RAM that aids in the preparation of forensically sound evidence.
Learning Outcome
- You will be able to utilize built-in Volatility 3 plugins for memory analysis tasks.
- You will be able to demonstrate how to identify the correct memory profile for the target system.
- You will be able to extract information about process names, IDs, parent-child relationships, and command-line arguments.
- You will be able to identify anomalies, rootkits, or injected code within memory regions.
- You will be able to explain techniques for extracting sensitive data from memory regions.
- You will be able to describe methods for identifying and extracting database connection strings, passwords, and other relevant information.
Tools
Kali Linux VMware/VirtualBox: https://www.kali.org/get-kali/#kali-virtual-machines
Volatility3: https://github.com/volatilityfoundation/volatility3
Setting up Volatility Framework
Volatility is a powerful digital forensics and incident response framework that consists of multiple useful plugins that provide forensic investigators with a wealth of information retrieved from memory images. Though volatility is a cross-platform tool that can be run on any major operating system that supports Python, we are going to use it on Kali Linux.
You may install Volatility 3 on your Kali Linux VMware/VirtualBox by following the step-by-step guide here.
Part 1: Forensic memory analysis using Volatility 3
Activity 1: Identifying OS Information
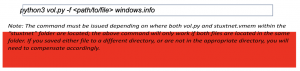
Dump analysis helps determine the OS profile. It is important to know the information about the operating system that was in use prior to the investigation. The command “-f” is used to specify the file and also specify the plugin required, in this case it is windows.info.
- Copy the folder “MemoryForensics” into the virtual machine desktop.
- Open the terminal and ensure volatility is installed.
- Once installed, copy the “stuxtnet” folder from the “MemoryForensic” directory into the “volatility3” directory.
- Next, navigate into the volatility3 directory in your terminal and use the following command to obtain the OS information:
Questions:
- What is the operating system of the dumped machine?
- What was the system date and time of the dumped machine? (Answer should be in the format YY- MM – DD_HH: MM: SS Timestamp in UTC)
Activity 2: Identifying Malicious Process.
When a system is in an active state, there are multiple processes running in the background, which can be found in volatile memory. This includes hidden processes that can be parsed from a memory dump and recently terminated processes before reboot. Looking at the running processes of a device is a great way to identify any malware that may be running on the device. Below are few commands in Volatility 3 that can be used to analyse running processes.
pslist

You can use this function to take a look at the process names and see if there is anything interesting that catches your attention and simply google the name. This will help to quickly understand if it is something that’s legitimate or requires further attention.
pstree

You can use this function to get an idea of what process spawned another process. It makes it easier to spot suspicious process activity as you can see what process was launched e.g. ‘explorer.exe’ or ‘service.exe’ and see if the process is legitimate. Using pstree is a great way to spot these malicious processes masquerading as legitimate Windows processes. Windows processes will always run from set locations on disk and their parent process tends to be a set process.
Questions:
- How many lsass.exe process is running?
- What is the difference between PID and PPID?
- List the PIDs of these lsass.exe files?
- State the timestamp of the PPID 624? (Answer should be in the format YY- MM – DD_HH: MM: SS Timestamp in UTC)
- How many running processes was kick off by service.exe?
Activity 3: Searching for malware signature
Malfind command can be used to displays a list of processes that Volatility suspects may contain hidden and injected code. Basically, it finds for a suspicious VAD region based on the header information displayed in hex, the permissions, and some extracted assembly code in a process. The following command in volatility 3 can be used to look for possible injected code.

Questions:- Does the ‘malfind’ command of PID 680 provides any output?
- List the VAD memory region of PID 1928 that is suspicious?
- How many suspicious VAD memory regions does PID 868 have?
Part 2: Extracting Files using Volatility 3
Activity 1: Extracting database and password from memory dump
- Copy the “Lab2” folder from the “MemoryForensic” directory into the “volatility3” directory.
- Next, navigate into the volatility3 directory in your terminal and start analysing the machine dump by obtaining the OS information.
Questions:
-
What is the OS version of the machine dump?
-
State the year the dump was created?
-
Identify active running process by using the pslist command. (Hint: Look for running process related to password manager).
Question:
-
What is the file name and PID of the password manager process?
-
Run the following command to locate the database file of the password manager within the memory dump. (Hint: …\Users\SmartNet\Secrets\Hidden.xxxx).

Questions:- What is the database extension of the password manager?
- What is the offset address of database file?
- Next, extract the database file using the below command to a new directory of your choice.

- Subsequently, use the filescan command below to find files related to password (Hint: it is a .png file).
Questions:
- What is the filename of the .png file?
- What is the offset address of database file?
- Similarly, use the command in step 5 to extract the .png file and open it to obtain the password.
Question:- What is the password written on the .png file?
- Open the database extracted in step 5 using the relevant password manager programme (google for installation guidance). When opened, you will be prompt to enter the password. Enter the password extracted in step 7 to unlock the flag.
Question:
-
What is the hidden message in the flag?
-